Build Your Dream Shed: User-Friendly Plans for a 12x16 Structure
Dreaming of a spacious and organized shed to conquer your storage woes? This guide provides comprehensive, user-friendly plans for a 12x16 shed, complete with detailed material lists, ensuring a smooth and successful building process. Forget complicated blueprints – we'll break down each step, empowering you to create the perfect outdoor storage solution.

Foundation: Laying the Groundwork
A solid foundation is paramount for any successful shed build. This 12x16 structure requires a robust base capable of withstanding the weight and elements. We recommend a concrete slab for its durability and longevity. Before pouring the concrete, carefully level the ground using gravel and compacted soil to create a level bed. This prevents settling and ensures a square, stable structure.

Materials for the Foundation:
- Gravel: Approximately 1 cubic yard for leveling.
- Concrete: Order enough for a 4-inch thick slab, considering the dimensions of your shed (12ft x 16ft).
- Rebar: Use rebar to reinforce the concrete slab for added strength.
- Level: A builder's level is crucial for ensuring a perfectly level foundation.
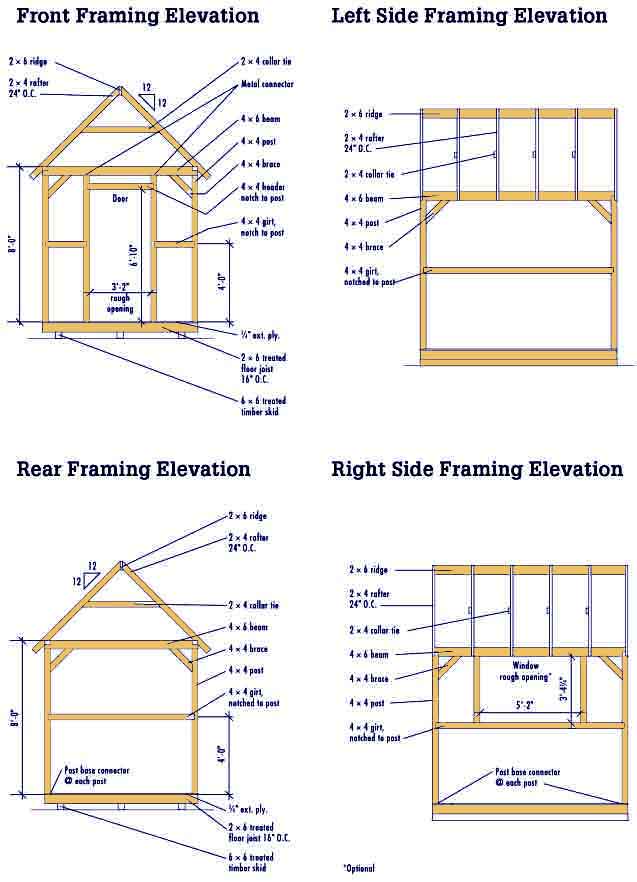
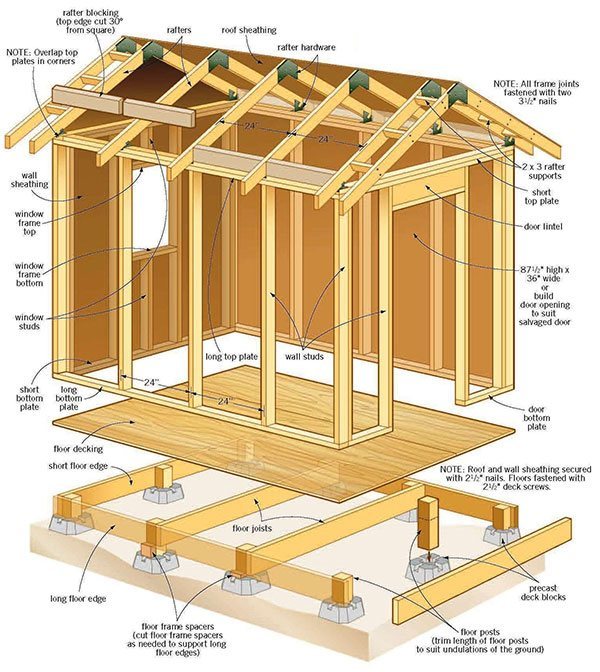
Framing: Building the Shed's Skeleton
The framing stage forms the backbone of your 12x16 shed. Precise cuts and proper assembly are crucial here. We recommend using pressure-treated lumber for superior durability and rot resistance. Start by building the floor frame, ensuring squareness at each corner. Then, erect the walls, carefully measuring and securing each stud. Double-check your measurements frequently to maintain accuracy. Remember to include appropriate bracing for structural integrity.
Materials for Framing:
- Pressure-treated lumber: 4x4 posts for corners and 2x4s for wall studs and floor joists. Calculate the quantity based on the shed's dimensions and spacing requirements (16" on center is standard).
- Joist hangers: These metal connectors ensure secure and strong connections between floor joists and beams.
- Simpson Strong-Tie connectors: Use these for added strength at critical connections.
- Screws and nails: Choose galvanized screws and nails for superior rust protection.
Roofing: Protecting Your Investment
The roof protects your shed from the elements, so choosing the right materials and ensuring a proper installation is essential. A simple gable roof is a cost-effective and visually appealing option for a 12x16 shed. Carefully measure and cut the rafters, ensuring they are properly aligned and secured to the top plate of the walls. Install roofing felt or underlayment before applying your chosen roofing material.
Materials for Roofing:
- Roof trusses or rafters: Pre-fabricated trusses simplify the process. Alternatively, calculate the required lumber for rafters and construct them yourself.
- Roofing felt/underlayment: Protects the structure from moisture.
- Roofing shingles: Asphalt shingles are a popular, affordable, and durable choice.
- Ridge cap and starter shingles: These complete the roofline.
Siding and Doors: The Finishing Touches
The siding and doors are the final steps, transforming your framed structure into a functional and aesthetically pleasing shed. Choose siding that complements your landscape and provides weather protection. Install the siding carefully, ensuring proper overlaps for water resistance. Finally, hang your chosen door(s), ensuring a secure and smooth operation.
Materials for Siding and Doors:
- Vinyl or metal siding: These are low-maintenance and durable options.
- Shed door(s): Choose a door size and style that suits your needs and budget. Consider a double door for easier access to larger items.
- Trim boards: These add a professional finish to the shed.
- Exterior paint or sealant (optional): Enhance the shed's appearance and protect it from the elements.
Disclaimer: These plans provide a general guideline. Always consult local building codes and obtain necessary permits before starting your project. Adjust material quantities based on your specific needs and design preferences. Remember safety first – wear appropriate safety gear throughout the construction process.